
Wet and Dry Bathroom Zoning: How to Plan It Correctly
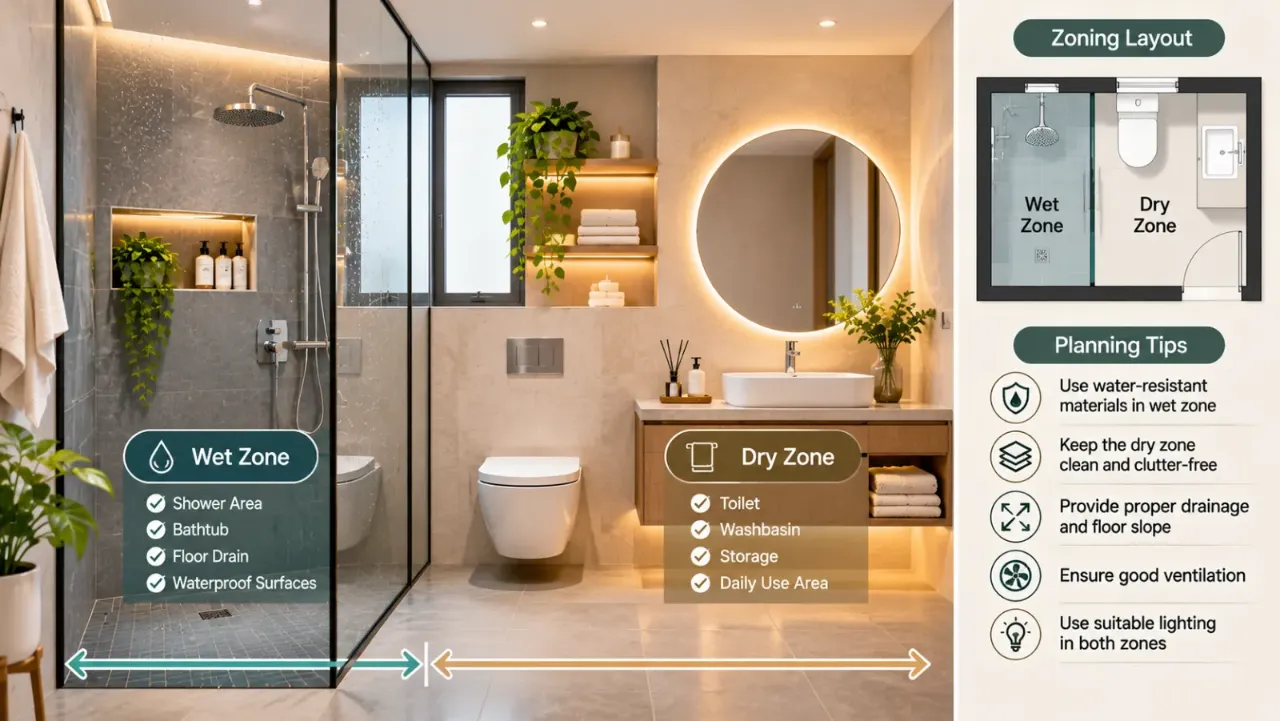
A bathroom is used for several activities, but not every area needs to get wet. The shower creates regular water exposure, while the vanity, toilet, storage and electrical points are generally easier to use when they remain as dry as possible.
This is where wet and dry bathroom zoning becomes important. It is a way of organising the bathroom so that water stays within the bathing area instead of spreading across the entire floor.
A well-planned layout can make everyday cleaning easier, reduce unwanted splashing, protect bathroom storage and improve usability. However, simply installing a glass partition does not automatically create an effective wet and dry bathroom. The layout, floor slope, drain position, waterproofing and ventilation must all work together.
Here is how to plan the zones correctly before starting the work.
1. Understand What Wet and Dry Zoning Means
Wet and dry zoning divides a bathroom according to how different areas are used and how much water they are expected to receive.
Wet Zone
The wet zone is the area where water is used directly. It usually includes:
- Shower area.
- Bathtub or bathing space.
- Shower fittings and controls.
- Shower niche or bathing accessories.
- Floor drain serving the shower area.
This section needs appropriate waterproofing, drainage, floor slope and slip-resistant flooring.
Dry Zone
The dry zone contains fixtures and storage that should remain relatively free from shower splashes. It usually includes:
- Washbasin and vanity.
- Mirror and grooming area.
- Toilet.
- Storage cabinets and shelves.
- Towel storage and other accessories.
- Electrical points installed in accordance with applicable safety requirements.
The term dry zone does not mean that these surfaces will never get wet. A basin can splash, floors may need mopping and humidity can spread through the room. The aim is to prevent unnecessary water from the shower from spreading into the rest of the bathroom.
2. Start With the Bathroom Layout
Before selecting a partition or deciding on tile finishes, study the bathroom's dimensions and fixture positions.
The shower should ideally be positioned where it can be separated from the vanity and toilet without making movement difficult. If the bathroom has a window, door, plumbing shaft or existing drain, these should also influence the layout.
- Bathroom entrance: Avoid placing the entrance directly in the main shower splash path.
- Shower position: Locate the shower where water can be directed towards a dedicated drain.
- Vanity placement: Keep the basin accessible without requiring someone to walk through the shower area.
- Toilet position: Allow comfortable access and sufficient clearance around the fixture.
- Storage: Place moisture-sensitive storage outside direct shower spray.
- Movement: Ensure the partition, door and fixtures do not obstruct one another.
The objective is to create a logical sequence of use. Ideally, someone should be able to enter, use the basin or toilet, and access storage without having to cross the shower area.
3. Choose the Right Method to Separate the Zones
The boundary between wet and dry areas does not always need to be a full wall. The best solution depends on bathroom size, shower position, water flow and the level of separation required.
Full Glass Shower Partition
A glass partition is one of the most common ways to separate a shower from the rest of the bathroom.
Advantages:
- Allows natural and artificial light to pass through.
- Keeps the bathroom visually open.
- Helps control shower splashes.
- Creates a clear division without a solid wall.
What to check:
- Glass thickness and safety specification.
- Suitable hinges, channels and support fittings.
- Door opening direction and clearance.
- Seals and gaps where water may escape.
- Ease of cleaning and hardware maintenance.
A fixed glass panel may work when the showerhead and floor layout are planned carefully. An enclosed shower with a door may provide better splash control where the bathroom has enough space.
Half-Height Partition
A tiled half-height wall can create a boundary while allowing the bathroom to remain visually connected.
It may be useful when the partition also needs to support a niche, provide privacy or create a separation between fixtures.
However, its height and length must be planned around the shower spray direction. A short wall may not stop water from reaching the vanity or toilet.
Shower Curtain
A shower curtain can be a flexible option for smaller bathrooms or homes where a fixed glass enclosure is not practical.
It can be pulled aside when the shower is not in use and is generally easier to replace than a permanent partition.
Choose a suitable water-resistant curtain and a secure track. Ensure the curtain is long enough to contain splashes and does not interfere with the shower drain.
Full-Height Wall or Enclosed Shower
A full-height partition can provide stronger separation and privacy. It may also allow the shower to be treated as a more independent enclosure.
However, it can make a small bathroom feel enclosed and may reduce light or ventilation if openings are not considered. Plan the door, ventilation and access carefully.
4. Plan the Shower Area and Water Flow
The shower zone should be designed around where water actually falls, not simply around the position of the glass partition.
Check the showerhead direction, hand shower position and likely splash range. A showerhead facing an opening can send water outside the intended wet area even when a glass panel is present.
Plan for:
- A showerhead positioned to direct water away from the entrance.
- A suitable floor drain within the wet zone.
- A floor gradient that directs water towards the drain.
- A shower enclosure or partition that limits splash escape.
- Accessible shower controls.
- A practical location for toiletries and a shower niche.
A linear drain can work well along a shower boundary or wall, depending on the layout. A point drain may also be suitable. The choice should be coordinated with the floor slope and tile format.
The installer should check the finished floor for low spots where water can collect.
5. Get the Floor Slope and Threshold Right
A partition alone cannot prevent water from spreading if the floor is poorly planned.
The wet-zone floor needs a suitable slope towards the drain. The slope should be formed in the underlying floor preparation rather than relying on thick adhesive or tile adjustments to correct an uneven surface.
A raised threshold or shower curb can help restrict water movement, but it is not always necessary. It can also create an obstacle for people with mobility needs or make access less convenient.
Before deciding on a threshold, consider:
- Whether the shower floor can be recessed.
- The available floor-to-floor height.
- Drain and plumbing positions.
- Door clearance.
- Accessibility requirements.
- The risk of water escaping at the partition opening.
Where a level-entry shower is preferred, the drainage design and waterproofing become especially important. Do not remove a threshold without checking that the floor and drainage arrangement can contain water effectively.
6. Treat Waterproofing as a Separate Requirement
Wet and dry zoning reduces water spread, but it does not replace bathroom waterproofing.
The shower floor and other areas exposed to regular water need a properly designed waterproofing system beneath the tile finish. Wall-floor junctions, corners, pipe penetrations and drain connections require particular attention.
Before tiles are installed:
- Prepare the substrate correctly.
- Apply a compatible waterproofing system.
- Reinforce corners and joints where specified.
- Seal pipe penetrations and drain connections.
- Complete the required curing period.
- Conduct the specified water-retention or ponding test before covering the waterproofed surface.
The waterproofing system should follow the product manufacturer's installation instructions and the project specification. Tiles and grout are the visible finish, not the primary waterproofing layer.
7. Keep the Dry Zone Practical and Accessible
The dry zone should not become an afterthought once the shower enclosure is planned.
The vanity, toilet and storage should be positioned so that everyday activities remain comfortable.
Vanity and Basin
Keep enough space in front of the basin to stand comfortably. The mirror, tap and storage should be accessible without the user having to step into the wet zone.
Choose materials and finishes suitable for bathroom humidity, particularly for cabinets, drawer edges and internal fittings.
Toilet
Provide comfortable clearance around the toilet and ensure that the shower partition does not obstruct access or cleaning.
Storage
Keep towels, toiletries and moisture-sensitive items away from direct shower spray. Closed cabinets can help protect stored items, while open shelves are better suited to products that can tolerate bathroom conditions.
Electrical Points
Electrical fittings, switches, sockets, lighting and exhaust equipment must be located and selected according to applicable electrical safety requirements and bathroom wet-area zones. Do not assume that a point is safe merely because it is outside the glass partition. Have the placement checked by a qualified electrician.
8. Plan Ventilation for Both Zones
Even when shower water is contained, moisture does not stay inside the wet zone. Warm, humid air can travel throughout the bathroom and condense on cooler walls, mirrors, ceilings and cabinets.
A window can help provide natural ventilation, but it may not be sufficient on its own. An appropriately sized exhaust fan, correctly ducted to an outdoor discharge point, can help remove humid air.
Consider these details:
- Position ventilation to remove moisture effectively.
- Avoid blocking airflow with full-height partitions.
- Provide a suitable route for replacement air.
- Use moisture-suitable finishes and materials.
- Allow the shower enclosure and surfaces to dry after use.
- Check corners, ceilings and cabinet interiors for recurring dampness.
A well-separated bathroom still needs a proper moisture-management plan.
9. Select Materials for Each Zone
Different surfaces face different conditions, so material selection should reflect their use.
| Bathroom element | Practical selection considerations |
|---|---|
| Shower floor | Suitable wet slip resistance, drainage and easy cleaning |
| Dry-zone floor | Durable finish, comfortable use and manageable cleaning |
| Shower walls | Water-suitable tiles and compatible installation system |
| Vanity cabinet | Moisture-resistant construction and protected edges |
| Glass partition | Safety-rated glass and suitable hardware |
| Grout and sealant | Products recommended for the exposure and joint type |
| Ceiling | Finish suitable for bathroom humidity and ventilation conditions |
The floor in the shower should receive particular attention. A glossy tile that looks attractive in a showroom may not be appropriate for a wet walking surface. Check the manufacturer's wet slip-resistance information rather than relying on the words matte or anti-skid alone.
10. Common Wet and Dry Zoning Mistakes
- Installing a glass panel without checking shower spray direction: Water can escape around the open side.
- Placing the drain outside the main wet area: Water may collect or travel towards the dry zone.
- Ignoring floor slope: Standing water can remain even when the drain is correctly positioned.
- Using a threshold as the only water-control measure: A raised strip cannot compensate for poor drainage.
- Treating tiles as waterproofing: The concealed waterproofing layer is essential.
- Blocking ventilation: A fully enclosed shower can retain moisture if airflow is not considered.
- Overcrowding the dry zone: Poor fixture clearances make the bathroom difficult to use.
- Ignoring electrical safety: Wet-area electrical installations need appropriate planning and professional verification.
- Choosing a partition that obstructs movement: Door swings, cleaning access and entry clearance should be checked before installation.
11. Wet and Dry Bathroom Zoning Checklist
- Identify the wet and dry areas on the floor plan.
- Position the shower to minimise splash towards the entrance and vanity.
- Select a suitable glass partition, wall or curtain.
- Check shower door opening and movement clearances.
- Confirm drain location and floor slope.
- Decide whether a threshold is necessary and accessible.
- Specify waterproofing before tile installation.
- Keep the vanity and storage away from direct shower spray.
- Coordinate electrical points with a qualified electrician.
- Plan exhaust ventilation and replacement airflow.
- Select suitable floor tiles, wall tiles and grout.
- Inspect drainage and water containment before handover.
Final Thoughts
Wet and dry bathroom zoning is not simply about adding a glass partition. It is about planning how people move through the bathroom, where water falls, how it drains and how the rest of the space stays comfortable.
Start with the fixture layout, then coordinate the partition, floor slope, drainage, waterproofing and ventilation. When these elements are planned together, the bathroom becomes easier to maintain and more practical for everyday use.
Plan Your Home Interiors with Walls to Wonder
Make more informed interior design decisions with Walls to Wonder's AI-powered tools. Explore finishes, estimate costs and evaluate your design choices before starting your project.
- Whole Home Visualizer – Explore how different design choices can work across your home.
- Design My Room – Experiment with room layouts, styles and visual ideas.
- Interior Design Cost Estimate – Get an initial estimate for your interior design requirements.
- Interior Quotation Checker – Review and understand interior project quotations.
- Rate My Room Design – Get feedback on your room design.
- Interior Style Finder – Discover an interior style that suits your preferences.
Explore more at Walls to Wonder.
Frequently Asked Questions
1. What is wet and dry zoning in a bathroom?
Wet and dry zoning separates the shower or bathing area from the vanity, toilet and storage areas. The aim is to contain shower water and reduce unnecessary splashing across the rest of the bathroom.
2. Is a glass partition necessary for wet and dry separation?
No. A glass partition is one option, but a shower curtain, half-height wall or enclosed shower can also create separation. The right choice depends on the bathroom layout, water flow, available space and access requirements.
3. Can wet and dry zoning work in a small bathroom?
Yes. A compact bathroom can use a fixed glass panel, a suitable shower curtain or a carefully designed shower enclosure. The key is to protect the main dry-use areas without making movement difficult.
4. Does a wet and dry bathroom still need waterproofing?
Yes. Zoning only helps control water movement. The shower floor and other exposed areas still require an appropriate waterproofing system beneath the tiles.
5. Should the shower floor be lower than the dry area?
Not necessarily. A recessed shower floor or raised threshold may help with water containment, but a level-entry shower can also work when the slope, drain and waterproofing are properly designed.
6. Where should the bathroom drain be placed?
The drain should be positioned so that water flows towards it from the shower floor. Its location should be coordinated with the shower layout, floor slope and tile pattern.
7. Does a glass partition prevent bathroom humidity?
No. It can help contain direct splashes, but humid air can still move throughout the bathroom. Proper ventilation is needed to manage moisture and reduce condensation.
Turn this idea into a plan for your home
Visualise your space, understand the likely budget, or find a professional who can bring the idea to life.