
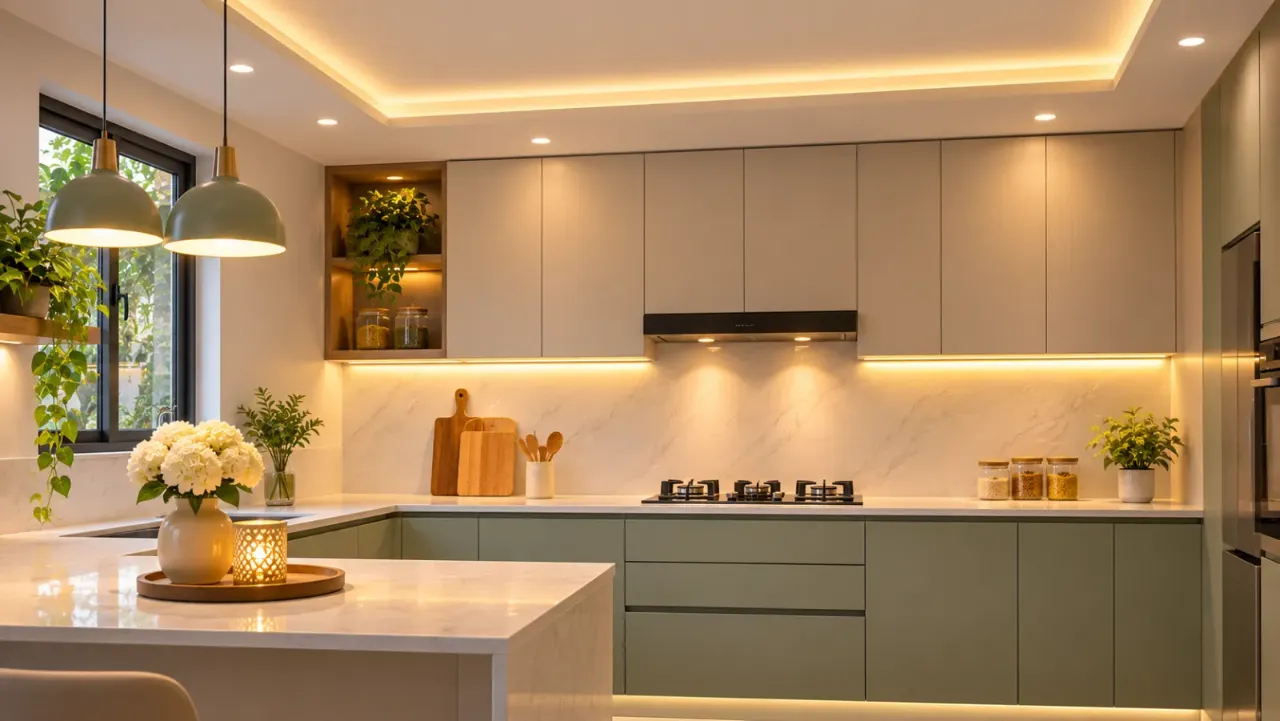
Kitchen Lighting Plan: Task, Ambient and Under-Cabinet Lighting
Kitchen lighting affects much more than how a room looks. It determines how comfortably you can prepare food, read measurements, clean surfaces and move around the kitchen. A poorly positioned light can leave shadows on the countertop, make the sink difficult to use or create glare on glossy cabinet finishes.
A practical kitchen lighting plan combines three main layers: ambient lighting for general visibility, task lighting for work areas and under-cabinet lighting to illuminate the countertop. Accent or decorative lighting can add another layer, but it should come after the functional requirements are addressed.
The right arrangement depends on the kitchen layout, cabinet design, ceiling height, natural light and the way the household cooks. Here is how to plan each layer.
1. Start With the Kitchen Work Zones
Before selecting fixtures, identify the areas that need light. Most kitchens have a few essential work zones:
- Preparation counter: Needs even, focused light for chopping, mixing and measuring.
- Cooking zone: Needs sufficient illumination around the hob and controls without creating glare.
- Sink area: Needs clear visibility for washing, rinsing and cleaning.
- Storage areas: Cabinets, drawers and tall units may need additional internal lighting.
- Walkways and general circulation: Need comfortable overall illumination without dark corners.
Think about where people stand while working. A ceiling light directly behind someone may cast a shadow across the counter. This is one reason a single central fixture rarely provides the best kitchen lighting.
2. Ambient Lighting: Illuminate the Whole Kitchen
Ambient lighting provides the general illumination that makes the kitchen comfortable to use. It is the foundation of the lighting plan.
Common options include:
- Recessed ceiling lights: Useful for distributing light across the room without taking up visual space.
- Surface-mounted ceiling fixtures: Practical where a false ceiling is not planned.
- Track lighting: Allows individual heads to be directed towards different parts of the kitchen.
- Cove lighting: Creates a softer indirect glow when incorporated into a suitable ceiling detail.
For even coverage, plan the positions of ceiling lights around the kitchen layout rather than placing them at equal distances without considering the counters and cabinets.
A large kitchen may need several lighting points. A compact kitchen may need fewer, but the light should still reach the main work surfaces. Avoid relying on a decorative pendant or a single bright fixture to illuminate the entire room.
3. Task Lighting: Focus on the Areas Where You Work
Task lighting provides focused illumination for specific activities. It is especially important in kitchens because people regularly work with knives, hot cookware and small ingredients.
Countertop and preparation area
The preparation counter needs light that reaches the working surface without creating strong shadows. Under-cabinet LED lighting is one of the most practical ways to achieve this.
If there are open counters without overhead cabinets, consider adjustable ceiling lights or track lights positioned to illuminate the surface from a useful angle.
Sink area
The sink can become a shadowed area if it sits beneath a cabinet or away from the main ceiling light. A dedicated ceiling light or suitable under-cabinet fixture can improve visibility.
Choose fittings appropriate for the moisture conditions and installation location. Electrical work near water should be planned and installed by a qualified electrician.
Cooking area
The hob needs clear illumination so that cookware, controls and the cooking surface are visible. A properly designed chimney or range hood may include integrated lights.
Check whether those lights adequately cover the hob. If not, a suitable additional fixture may be needed. Any light near cooking equipment must be selected and positioned according to the appliance and fixture manufacturer's heat-clearance instructions.
4. Under-Cabinet Lighting: Make Countertops Easier to Use
Under-cabinet lighting is one of the most useful features in a modular kitchen. It places light close to the countertop, reducing the shadows that can occur when the main ceiling light is behind the person working.
Popular options include:
- LED strip lights: Provide continuous illumination along the counter and work well for long cabinet runs.
- LED profile lights: House the strip inside a channel, often with a diffuser that helps create a more even appearance.
- Puck lights: Small individual fixtures that create separate pools of light rather than a continuous line.
- Integrated cabinet lights: Built into the cabinet design for a clean, coordinated finish.
For most work counters, a continuous or well-spaced linear light source is usually more useful than widely separated bright spots.
Where should under-cabinet lights be placed?
Position the light towards the front or working side of the underside of the cabinet, while ensuring the source is concealed from normal viewing angles. This helps direct light onto the counter rather than the backsplash alone.
Before installation, check:
- Whether the light covers the full usable counter depth.
- Whether the LED strip is visible when standing or sitting nearby.
- Whether the profile or diffuser creates an even line of light.
- Whether the fitting is protected from heat, steam and splashes in its intended location.
- How the wiring, driver and access for future replacement will be handled.
A neat installation should also account for cabinet joints, corners, the chimney and any gaps between cabinet sections.
5. Choose the Right Colour Temperature
Colour temperature changes how the kitchen feels and how surfaces appear. It is measured in Kelvin (K).
| Colour temperature | Appearance | Where it can work |
|---|---|---|
| 2700K–3000K | Warm white | Softer, relaxed kitchen atmosphere |
| 3000K–3500K | Neutral-warm white | Comfortable general and task lighting |
| 3500K–4000K | Neutral to cool white | Clearer work lighting and contemporary kitchens |
| Above 4000K | Cooler white | Specific functional settings where a cooler appearance is preferred |
For a balanced kitchen, avoid mixing noticeably different white tones across adjacent fixtures. For example, a very warm under-cabinet strip beside a cool ceiling light can make the same countertop appear to have two different colours.
Colour temperature is not the only factor. A good colour rendering index (CRI) helps food, cabinetry and countertop finishes appear closer to their actual colours. A CRI of 90 or above is worth considering where accurate colour appearance is important.
6. Add Accent and Decorative Lighting Carefully
Accent lighting is optional, but it can give a kitchen more depth and visual interest.
Some possibilities include:
- Lighting inside glass-fronted display cabinets.
- Small lights inside open shelves.
- Concealed lighting in selected niches.
- Pendant lights above a kitchen island or breakfast counter.
- Subtle lighting beneath a floating breakfast counter, where suitable.
Decorative lighting should not replace task lighting. A pendant above an island may look attractive, but it may not illuminate the sink or preparation counter adequately.
Keep decorative fixtures proportionate to the kitchen and make sure they do not obstruct sightlines, cabinet doors or movement.
7. Plan the Lighting According to Your Kitchen Layout
Different layouts create different lighting requirements.
L-shaped kitchen
Pay particular attention to the corner where the two counters meet. A well-positioned ceiling light or continuous under-cabinet lighting can prevent the corner from becoming a dark working area.
Parallel kitchen
Distribute ambient lighting across both counter runs. Consider separate task-lighting zones if the counters are used independently.
U-shaped kitchen
Make sure the back counter and corners receive sufficient light. Do not assume that a central ceiling fixture will reach all three sides evenly.
Island kitchen
Plan separate illumination for the island, particularly if it is used for chopping, serving or dining. Pendant lights can be combined with general ceiling lighting, provided the working surface is adequately illuminated.
Compact kitchen
Use a simple, coordinated lighting plan. Recessed or surface-mounted ceiling fixtures combined with under-cabinet lights can provide useful coverage without overcrowding the ceiling.
8. Decide on Switches and Lighting Controls Before Installation
A well-designed kitchen should allow different lighting layers to operate independently.
Consider separate controls for:
- General ceiling lights.
- Under-cabinet task lights.
- Island or breakfast-counter lighting.
- Display or accent lighting.
This allows you to use bright task lighting while cooking and a softer combination when the kitchen is not in active use.
Dimmers can be useful with compatible fixtures and drivers. Before selecting them, confirm that the lights support dimming and that the controls are compatible. If smart lighting is planned, decide where the controls, drivers and connections will be located before cabinetry and ceiling work are completed.
9. Common Kitchen Lighting Mistakes to Avoid
| Mistake | Why it causes a problem | Better approach |
|---|---|---|
| Using only one ceiling light | Creates uneven illumination and shadows | Combine ambient and task lighting |
| Placing ceiling lights without considering counter positions | The person working may block the light | Plan fixture positions around the work zones |
| Installing visible LED strips | Can create glare and an unfinished appearance | Use a suitable profile and diffuser |
| Mixing very different colour temperatures | Makes the kitchen look visually inconsistent | Coordinate the white tones across layers |
| Ignoring the sink and hob | Leaves important work areas poorly lit | Plan dedicated illumination for these zones |
| Hiding drivers without access | Makes maintenance and replacement difficult | Provide accessible locations for drivers |
| Choosing decorative lights before functional lights | Can leave the kitchen attractive but impractical | Plan task and ambient lighting first |
10. Kitchen Lighting Planning Checklist
Before finalising the kitchen design, check the following:
- Identify the preparation, sink and cooking zones.
- Plan even ambient lighting across the kitchen.
- Check that ceiling lights will not create shadows on counters.
- Include under-cabinet lighting where it is useful.
- Select fixtures suitable for heat and moisture conditions.
- Coordinate colour temperature and colour rendering.
- Decide which lighting layers need separate switches.
- Confirm dimmer and smart-control compatibility, if required.
- Plan wiring, drivers and maintenance access.
- Review the complete lighting layout with the electrician before installation.
Conclusion
A functional kitchen lighting plan is built around the way the space is used. Ambient lighting provides overall visibility, task lighting supports cooking and cleaning, and under-cabinet lights make countertop work more comfortable. Accent lighting can then add visual interest without compromising practicality.
The best time to plan these details is before finalising the cabinets, ceiling and electrical points. This helps avoid visible wiring, poorly positioned fixtures and dark work surfaces after installation.
A kitchen should look good, but its lighting should work just as well during everyday cooking.
Frequently Asked Questions
1. What are the three main types of kitchen lighting?
The three main types are ambient lighting for general illumination, task lighting for work areas such as counters and sinks, and accent lighting for display shelves, niches and decorative features.
2. Is under-cabinet lighting necessary in a modular kitchen?
It is not compulsory, but it is highly useful. It illuminates the countertop directly and can reduce shadows created by overhead cabinets and ceiling lights.
3. Which LED light is best for kitchen cabinets?
LED strips fitted inside suitable profiles are a popular option because they provide continuous illumination. The correct choice depends on the cabinet design, required brightness, heat exposure and installation conditions.
4. What colour temperature is suitable for kitchen lighting?
Neutral-warm to neutral white, roughly 3000K–4000K, works well in many kitchens. The final choice should consider the cabinet and countertop colours, the desired atmosphere and consistency between fixtures.
5. Should kitchen ceiling lights be placed directly above the countertop?
Not automatically. Their position should be planned so that the person working does not cast a shadow over the surface. Under-cabinet lighting can provide more direct illumination.
6. Can LED strip lights be installed near the kitchen hob?
Only when the selected strip, profile and installation location are suitable for the heat and environmental conditions. Follow the product manufacturer's instructions and keep electrical components within their specified operating limits.
7. Should kitchen lights have separate switches?
Separate controls are useful because they let you operate ambient, task and accent lighting independently. This makes it easier to adjust the kitchen for cooking, cleaning and relaxed use.
8. When should kitchen lighting be planned?
Plan it during the kitchen design and electrical-layout stage, before cabinets, false ceilings and wall finishes are finalised. This allows wiring, drivers, switches and fixture positions to be coordinated properly.
Plan Your Kitchen With Walls to Wonder
Good kitchen design brings together layout, lighting, materials and everyday functionality. Explore Walls to Wonder's AI tools to visualise your ideas, understand design choices and plan your home interiors.
- Whole Home Visualizer – Explore how different design choices can work across your home.
- Design My Room – Experiment with room designs and visual ideas.
- Interior Design Cost Estimate – Explore estimated interior design costs.
- Interior Quotation Checker – Review and understand interior design quotations.
- Rate My Room Design – Get feedback on your room design.
- Interior Style Finder – Discover an interior style that suits your preferences.
Explore more at Walls to Wonder.
Turn this idea into a plan for your home
Visualise your space, understand the likely budget, or find a professional who can bring the idea to life.