
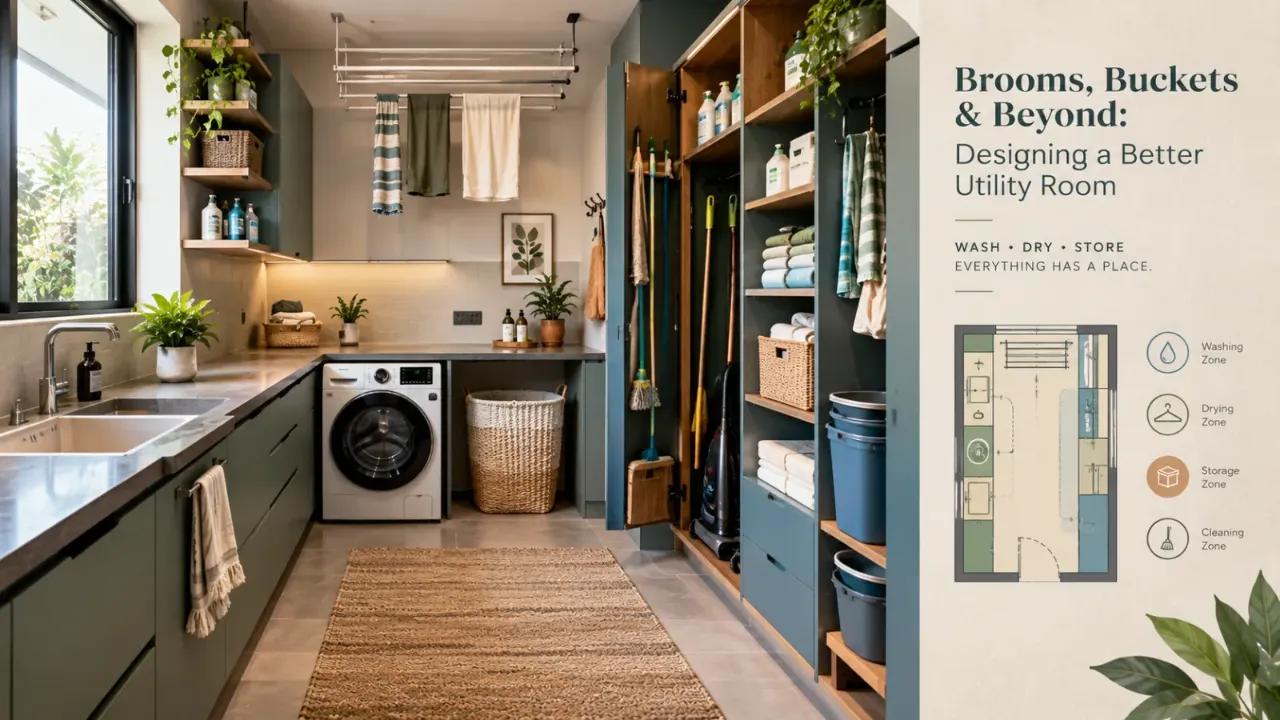
Brooms, Buckets & Beyond: Designing a Better Utility Room
There is a room in many homes that nobody really plans beautifully. It is the place where the broom ends up leaning against a wall, the mop sits in a bucket, cleaning liquids occupy whichever shelf is available, and a toolbox appears whenever something needs fixing.
The problem is usually not a lack of storage. It is a lack of storage designed around the things actually stored there.
A broom is tall. A bucket is bulky. A mop needs to dry. A toolbox is heavy. Cleaning products need controlled storage. Laundry supplies need easy access.
You are designing a collection of different storage types for different objects.
Start With What Actually Lives There
Before designing shelves or cabinets, make a list of everything your utility area needs to accommodate.
- Brooms and dustpans
- Mops
- Buckets
- Cleaning brushes
- Floor-cleaning equipment
- Laundry detergents
- Fabric-care products
- Garbage bags
- Cleaning cloths
- Basic household tools
- Screwdrivers and other small repair tools
- Measuring tape
- Extension cords
- Small repair supplies
- Step stools
- Extra containers
- Drying accessories
- Occasionally used equipment
You are designing a collection of different storage types for different objects.
The First Rule: Use the Height
Brooms and mops are among the easiest things to store badly.
Because they are tall and narrow, laying them horizontally consumes shelf space while leaving awkward unused height above.
A better approach is to create a dedicated vertical zone using a tall cabinet, narrow open bay, wall-mounted holders, hooks, or a combination of these.
The important thing is that the cleaning tools should have a predictable place to stand.
Give Every Tall Tool Its Own Place
A vertical storage zone can be divided with simple hooks, clips, rails, or compartments.
This makes it easier to take one item out quickly, return it without disturbing others, keep handles from falling over, and prevent the floor from becoming a tangled collection of cleaning tools.
Wet Mops Need Air, Not Just a Cabinet
A freshly used mop should not simply be pushed into a closed cupboard while still wet.
It needs a practical place to drain and dry.
Useful when the room is compact and a simple drying point is enough.
Useful when several wet cleaning tools need to remain organised.
Can keep equipment visually contained while still allowing airflow.
A dedicated area near suitable drainage can help manage wet cleaning equipment.
Wet equipment should have a drying zone, not just a storage zone.
Buckets Need Floor-Level Storage
Buckets are bulky, awkward to stack, and often need to be pulled out while cleaning.
A lower utility cabinet or open floor-level compartment often works better. If you have multiple buckets, consider whether compatible buckets can nest inside one another.
Leave enough practical room to remove the one you need without pulling apart the entire stack.
Do Not Forget the Bucket Handle
A bucket may technically fit inside a cabinet but become irritating if you have to rotate it awkwardly every time you pull it out.
When planning a compartment, think about the object being used rather than just its closed footprint.
Give the Dustpan a Home Next to the Broom
A simple hook beside the broom can keep these two cleaning tools together and prevent the dustpan from disappearing behind shelves or under the washing machine.
Cleaning Products Should Not Be Randomly Distributed
Detergents, floor cleaners, disinfectants, sprays, and other cleaning supplies often accumulate in a utility room.
Give them one defined zone with shelves that are easy to wipe and appropriately sized for the containers you actually buy.
Keep frequently used products at comfortable reach. Less frequently used supplies can move higher. Heavy containers are generally better placed lower rather than overhead.
Separate Tools From Cleaning Chemicals
A toolbox can contain repair items while cleaning products have their own enclosed storage.
This makes the room easier to organise and reduces the chance of small hardware disappearing among bottles and cloths.
Tools Need Better Storage Than “Put Them in a Box”
A toolbox is useful, but not everything needs to live inside one.
Frequently used tools such as screwdrivers, pliers, measuring tape, small levels, utility tools, or electrical accessories can be grouped in a compact organiser, drawer, pegboard, or dedicated cabinet.
If you have to empty a large toolbox every time you need one screwdriver, the storage is technically working but practically failing.
Use Drawers for Small Things
Drawers are particularly useful for the small objects that make utility rooms messy.
- Spare screws
- Wall plugs
- Hooks
- Tape
- Cable ties
- Batteries
- Small repair accessories
- Extra clips
Small drawers prevent these objects from becoming a loose collection at the bottom of a large cupboard.
Design Around the Washing Machine
If the utility room includes a washing machine, it will probably become the central working appliance.
Think about where detergent lives, where laundry baskets are placed, where dirty clothes wait, where clean clothes go, where pegs are stored, and where the person stands while loading the machine.
Do not fill every available side with cabinetry simply because the wall is empty.
Leave Space for the Laundry Basket
Laundry baskets are larger than they appear on a floor plan because they need to be pulled out, carried, emptied, and returned.
Consider whether the basket can sit under a counter, in a pull-out compartment, in a dedicated open bay, or beside the washing machine.
Counter Space Can Be Surprisingly Useful
A small utility counter can provide a place for sorting, folding, keeping supplies, or temporarily placing objects.
A narrow counter may be more useful than another row of closed cabinets if the household regularly needs a working surface.
Think About Ventilation
Utility rooms can combine water, cleaning products, damp fabrics, appliances, and limited air movement.
Depending on the room and building conditions, natural ventilation, an exhaust arrangement, or another suitable ventilation strategy may be needed.
Ventilated storage or a designated drying zone can be much more practical.
Keep Wet and Dry Zones Apart
Washing machine, sink if provided, buckets, mops, wet cleaning equipment and related supplies.
Tools, spare hardware, cleaning cloths, dry supplies, household accessories and backup stock.
The zones do not need a wall between them. Even a change in storage arrangement can create the separation.
Wet equipment stays closer to drainage. Dry equipment stays away from splashes.
Keep the Floor as Clear as Possible
A utility room can feel much smaller than it actually is when its floor becomes storage.
Move small objects onto shelves. Hang long objects. Use drawers for tiny accessories. Nest compatible containers. Use lower cabinets for heavy bulky items.
The floor should primarily support movement and the things that genuinely need to sit there.
Do Not Forget the Back of the Door
The back of a utility-room door can hold lightweight brushes, cleaning cloths, gloves, small dusters, spray bottles, reusable bags, or pegs.
Use it carefully. Anything mounted there should not interfere with the door closing, nearby shelves, or circulation.
Make the Storage Adjustable
Households change. The cleaning products you use today may change next year. You may buy a different vacuum or add another appliance.
Adjustable shelves, movable hooks, modular organisers, and a few open compartments provide more flexibility than one permanently fixed configuration.
Make Frequently Used Items the Easiest to Reach
Ask what you use every day, every week, once a month, and only for repairs.
Everyday items should have the easiest access. Occasional items can move higher. Rarely used equipment can go deeper into storage.
Heavy Things Should Live Lower
Buckets filled with water, large detergent containers, toolboxes, and spare equipment are not items you want to lift down repeatedly from a high shelf.
Upper storage is better suited to lightweight, infrequently used items.
Sharp and Small Tools Need Controlled Storage
A utility room may contain cutters, drill bits, blades, screwdrivers, nails, and other small repair items.
A dedicated drawer, tool case, cabinet, or organiser gives them a predictable location. Keep potentially hazardous items appropriately secured, especially in homes with young children.
Cleaning Cloths Need to Dry Properly Too
Cloths and reusable cleaning textiles are often thrown into a pile after use.
Provide a place where reusable cloths can be rinsed, hung, or dried properly before being stored.
The important thing is to distinguish used and damp from clean and dry.
Think About the “In Between” Items
Not everything in a utility room is either a broom or a detergent bottle.
- Folding step stools
- Extra dustbins
- Spare hoses
- Handheld vacuums
- Floor squeegees
- Drying stands
- Toolboxes
These are exactly the objects that make utility rooms feel chaotic because they do not fit neatly into standard cabinets.
Reserve a few intentionally open compartments for them.
Avoid Over-Deep Cabinets
Deep cabinets sound like maximum storage, but depth can become a problem in a utility room.
Small items disappear at the back. Cleaning products become difficult to see. Tools become buried. Buckets get trapped behind other objects.
Give the Utility Room a Visual System
A utility room does not need to look luxurious. But it can still look designed.
Use one consistent cabinet finish, repeat the same shelf material, group similar containers, keep labels facing outward, use matching organisers where useful, and keep the most visually chaotic objects behind doors.
Make Cleaning the Storage Easy
Utility rooms themselves get dirty. Dust gathers on shelves. Water splashes. Detergent spills. Mops drip.
Storage surfaces therefore need to be practical to wipe and maintain.
Avoid unnecessary decorative grooves, inaccessible corners, or complicated joinery where simpler construction would perform better.
Plan Electrical Access Too
Modern utility rooms often contain more than a washing machine. There could be a dryer, vacuum, steam cleaner, ironing equipment, charging devices, or other appliances.
Electrical planning should therefore be considered alongside storage.
Do not bury every power point behind fixed cabinetry. Think about where equipment will actually be used, charged, or stored.
At the same time, electrical points should be appropriately located away from water exposure according to the relevant electrical and building requirements.
The Utility Room Is Also a Service Room
Utility rooms may contain plumbing, drainage, electrical services, washing equipment, ventilation, or access points that need periodic maintenance.
Do not permanently block these areas with custom storage.
A beautiful cabinet that has to be dismantled to reach a service connection is poor planning.
Compact Utility Room? Use Three Vertical Layers
Lower Zone
Use for heavy objects such as buckets, toolboxes, larger containers, or equipment that needs stable floor-level storage.
Middle Zone
Reserve for everyday items that need frequent access, such as detergents, brushes, cloths, and smaller cleaning supplies.
Upper Zone
Use for lightweight or occasional items. Seasonal equipment, spare supplies, and less frequently used accessories can live here.
A Good Utility Room Should Support the Cleaning Sequence
Think about how the room actually works.
You take out the bucket. You fill it. You use the mop. You return. You empty the water. You rinse the mop. You leave it to dry. Later, you store it.
If the storage does not support that sequence, the room will always feel messy.
The same applies to laundry. The best storage plan follows these movements rather than simply providing a cabinet for each object.
The Goal Is Not Maximum Storage
A utility room can have wall-to-wall cabinetry and still feel completely disorganised.
More storage would not solve a broom forced into a short cupboard, a bucket stored behind three boxes, a toolbox mixed with cleaning liquids, or a laundry basket blocking the washing machine.
A Practical Utility Room Storage Checklist
Create a dedicated vertical zone with hooks, clips, rails, or a tall compartment.
Keep bulky buckets at accessible lower levels and allow enough clearance for their handles.
Provide a ventilated drying area rather than storing damp tools in closed cabinets.
Group bottles together on wipeable shelves and keep heavier containers lower.
Use a toolbox, drawers, organisers, or a dedicated cabinet for small repair equipment.
Give baskets, detergents, and drying accessories a clear relationship to the washing machine.
Reserve a few open compartments for step stools, hoses, handheld vacuums, and other awkward objects.
Keep plumbing, electrical, and equipment service points accessible for maintenance.
Before You Build the Cabinets, Do a One-Week Audit
Do not design the storage immediately.
For one week, notice what you actually take into the utility area. What gets left on the floor? What keeps being moved around? What do you reach for most often? What objects never have a proper home?
Your household's one-week behaviour is a much better design brief than a generic inspiration image.
Build Storage Around Real Objects
Measure the things you already own.
Look at the mop, broom, bucket, toolbox, laundry basket, washing machine, and other large equipment.
Storage designed without measuring the objects often creates unusable leftover gaps.
The best utility storage is not generic. It is sized around the real equipment of the home.
When a Closed Cabinet Is Better—and When It Isn't
Closed storage is excellent for visually messy items such as bottles, extra supplies, tools, and spare household accessories.
But some things benefit from staying visible or ventilated. Brooms and mops can be easier to access on hooks. Wet equipment needs airflow. Frequently used laundry supplies should not require opening several doors.
Make the Room Easy to Reset
A good utility room should be quick to put back in order.
Every major category should have an obvious home. Broom goes here. Mop goes there. Bucket goes below. Tools go in this drawer. Detergent goes on this shelf. Laundry basket goes under the counter.
When the system is obvious, everyone in the home can use it.
Bring Utility Storage Into the Overall Home Design
The utility room may be hidden from guests, but it still deserves thoughtful planning.
Good storage here can free up space elsewhere in the home. The utility room becomes the home's support system.
Bring Your Utility Room Into the Planning
Before finalising cabinetry, photograph the actual utility area and identify the equipment, tools, cleaning supplies, laundry items, and awkward objects that need a home.
Visualise Your Utility Area
With Walls to Wonder's AI Design My Room tool, you can upload a room photo and explore different interior directions around your existing space.
When you are ready to develop the utility area as part of a larger home project, you can explore professionals through Walls to Wonder's designer platform.
Final Thought
The utility room may not be the room guests notice first. But it is one of the rooms that quietly keeps the entire home functioning.
Brooms need height. Buckets need accessible storage. Mops need somewhere to dry. Tools need organisation. Cleaning products need sensible separation. Laundry needs a workflow.
The best utility room is not the one with the most cupboards. It is the one where everything has a logical place—and putting it back there takes almost no thought.
Frequently Asked Questions
1. How should I store brooms and mops in a utility room?
Use a dedicated vertical storage zone with hooks, clips, rails, or a tall compartment. Keeping long tools upright uses less floor area and makes them easier to access.
2. Where should buckets be stored?
Buckets are usually easiest to manage at floor or lower-cabinet level because they are bulky and often need to be pulled out quickly. Allow enough clearance for their handles and consider nesting compatible buckets.
3. Should wet mops be stored inside a closed cabinet?
A wet mop should have an opportunity to drain and dry rather than being sealed immediately into an unventilated cupboard. A hook, drying rail, ventilated compartment, or designated drying zone can work depending on the layout.
4. How should cleaning products be organised?
Group them together on practical, wipeable shelves. Keep frequently used items easy to reach and heavier containers lower. Keep tools and small hardware organised separately rather than mixing everything together.
5. How can I store tools in a small utility room?
Use a compact toolbox, dedicated drawers, organisers, or a small tool cabinet. Frequently used tools benefit from easy visibility and access instead of being buried inside a large mixed-storage box.
6. How do I make a small utility room feel less cluttered?
Use vertical storage for long items, lower compartments for bulky objects, shelves for bottles, drawers for small accessories, and a few open compartments for awkward equipment. Keep the floor as clear as possible.
7. Should utility-room cabinets be fully closed?
Not necessarily. Closed cabinets are useful for visually messy items, while open or ventilated storage can be better for frequently used tools and equipment that needs to dry.
8. What is the most common utility-room storage mistake?
Designing storage around generic cabinet sizes instead of the actual objects in the home. A broom, bucket, toolbox, mop, laundry basket, and detergent bottle all need different types of storage.
Turn this idea into a plan for your home
Visualise your space, understand the likely budget, or find a professional who can bring the idea to life.