
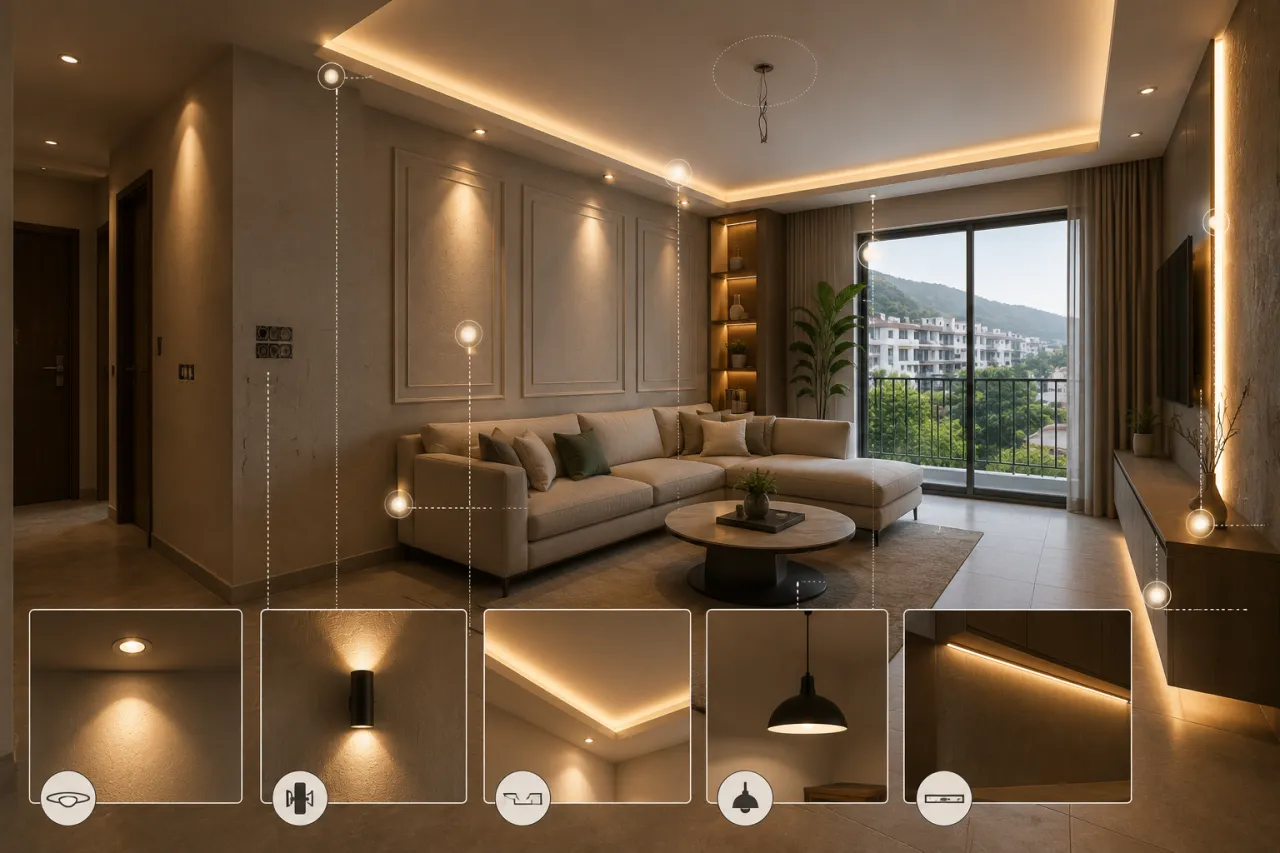
Home Lighting Planning in Ambegaon Budruk Before Ceiling and Furniture
A single misplaced switch can make an otherwise finished home feel unfinished. If a wardrobe blocks the bedside control, a ceiling fan lands in the centre of a planned cove, or the kitchen worktop remains shadowed, the correction usually involves repainting, cutting furniture or reopening the false ceiling. That is why home lighting planning in Ambegaon Budruk, Pune should happen while room dimensions, furniture positions and electrical routes are still being reviewed—not after the ceiling design is approved.
For a useful local starting point, browse designers and companies serving Ambegaon Budruk. The important comparison is not simply who offers more decorative fixtures. It is whether the designer can connect the reflected ceiling plan, furniture drawings and electrical schedule into one buildable decision.
First decide what each room must help you do
Lighting becomes easier to judge when the task comes before the fitting. A compact Pune apartment may need a living room for television viewing, conversation, children’s homework and occasional guests. One bright central light cannot serve all four situations comfortably. Plan three layers instead:
Ambient layer
This is the general light that lets people move around safely. It may come from ceiling fixtures, recessed downlights, a cove or a combination. Keep glare and excessive brightness in mind, especially in rooms with glossy flooring or a television wall.
Task layer
Task lighting supports a specific activity: food preparation, reading, dressing, studying or grooming. It should illuminate the working surface rather than create a bright patch behind the user.
Accent layer
Accent lighting draws attention to artwork, a textured wall, bookshelf or pooja niche. It is optional, but useful when the beam direction and switching are decided before finishes are installed.
Control layer
Scenes and separate switches determine whether the layers remain practical. A living room may need independent control for the main lights, cove, wall light, fan and balcony passage rather than one overloaded plate.
Ask for a room-by-room lighting intent sheet. It need not be complicated: list the activity, the light source, its control point and what must remain accessible after furniture installation. This exposes missing decisions earlier than a decorative ceiling sketch does.
Read the ceiling and furniture as one drawing
The most common clarity gap is that the false ceiling is designed from an empty room while the furniture is finalised later. In an Ambegaon Budruk home, this can affect a range of layouts, from a builder apartment to a renovated resale flat or a compact family home with a modular kitchen and full-height storage.
Request an updated furniture layout over the reflected ceiling plan (RCP). The RCP should show downlights, cove lines, pendant centres, fan boxes, access panels, AC diffusers where applicable, smoke detectors if specified, and the dimensions from walls. The furniture drawing should show bed edges, wardrobes, sofa arms, dining chairs, kitchen tall units and study desks. Overlaying the two reveals practical conflicts:
- A downlight falling directly over a tall wardrobe shutter, where it contributes little useful light.
- A pendant centre that aligns with the room rather than the dining table after the table size changes.
- A cove or bulkhead crossing an AC route or leaving no serviceable access.
- A fan centred visually in the ceiling but too close to a tall storage unit or pendant.
Professionals detect these risks by checking dimensions, not by relying on a three-dimensional view alone. A realistic render can look balanced while hiding a switch behind a cabinet. The drawing that resolves the issue is a coordinated RCP with wall elevations and electrical points marked against the final or near-final furniture plan.
Where comfort is won: room-specific decisions
Living room and passage
Use separate controls for general lighting, TV-wall or artwork accent lighting, and any cove. Keep downlights out of the direct sightline of a television where possible, because glare can become more irritating than a slightly dim room. Passage lights should not depend on a switch hidden inside the living room. If a foyer or circulation route is used at night, consider a low-level or independently controlled light rather than leaving all ambient lights on.
Kitchen
Kitchen lighting should be judged at the counter, not from the centre of the room. Under-cabinet lights are particularly important where wall cabinets or the user’s own body can cast a shadow across the worktop. Plan a separate circuit for task lighting so it can operate without turning on every ceiling fitting.
Discuss the required illumination with the designer or electrical consultant using the actual counter layout. Food preparation, chopping and cleaning demand more useful light than a decorative ceiling strip. The final choice depends on counter colour, cabinet depth, fitting output, beam spread and whether the light source is visible from seated areas.
Bedroom and wardrobe
Bedside control is a small detail with a large daily effect. Each side should ideally have a reachable switch for the room’s ambient light, and a reading light should be positioned for the person using that side. Confirm whether the control is placed on the wall, headboard or a side table; these are not interchangeable once the carpentry is fixed.
Wardrobe lighting needs its own decision. Vertical lights inside shutters, top-mounted strips or sensor-operated fittings all have different wiring and maintenance implications. Leave room for the shutter movement and confirm where the driver will sit. A concealed driver that cannot be accessed is a future repair problem.
Fan, AC and charging coordination
Fan points should be marked before the ceiling frame is closed. Check blade clearance against wardrobes, lofts, pendant lights and curtain tracks. Do not assume that a visually centred fan is structurally or functionally centred after the furniture plan changes.
Coordinate AC indoor-unit positions, drain routes, curtain pelmets and light coves. A deep cove may obstruct airflow or make servicing difficult. Charging points should be planned at bedsides, the study desk, kitchen appliance zones and the living-room media unit. Confirm socket height, furniture clearance and whether a multi-plug is being used to compensate for too few outlets.
Compare the designer’s scope, not just the number of fixtures
Designers and companies serving Ambegaon Budruk may offer different levels of involvement. Some may provide a concept and fixture suggestions; others may coordinate electrical drawings, false-ceiling details, carpentry elevations and site execution. Neither approach is automatically right. The suitable scope depends on how much coordination your project requires and who will supervise installation.
| Compare this | Ask for evidence | Why it matters |
|---|---|---|
| Lighting design | Room-wise layout showing ambient, task and accent points | Prevents decorative fixtures from replacing useful illumination |
| Electrical planning | Point schedule with switchboards, circuits, sockets and dedicated loads | Clarifies what is included and reduces late additions |
| Ceiling coordination | Dimensioned RCP with fan, AC and access-panel positions | Shows whether the ceiling can actually be built and serviced |
| Furniture coordination | Bed, wardrobe, kitchen, desk and media-unit elevations | Checks reachability, glare and obstruction |
| Execution support | Site-visit frequency, approval stages and responsibility for revisions | Separates a drawing service from an execution-managed service |
Quotation differences often come from exclusions. One proposal may include wiring, modular switch plates, drivers, installation and testing; another may list only light fixtures. Check whether civil patchwork, ceiling cut-outs, conduits, dimmers, sensors, fan regulators, AC points and final testing are separately charged. Costs vary with the number of points, ceiling complexity, fixture specification, wiring route, switchgear, automation and the extent of site coordination. Avoid treating a low total as comparable until the scope is normalised.
Use independent checks before approving the electrical package
Two simple tools can make the commercial review less subjective. The interior cost estimator can help organise a preliminary budget discussion, while the quotation checker can help you inspect line items and exclusions. They are decision aids, not substitutes for an electrical professional’s load assessment or site measurement.

Organise the budget
Use the cost tool to separate lighting, wiring, ceiling work, furniture coordination and installation assumptions before comparing proposals.
Review the interior cost estimator
Interrogate the quotation
Use the quotation checker to spot missing descriptions, unclear quantities and items that need written clarification.
Check a quotation before approvalQuestions worth asking before any advance
Keep the discussion specific. Ask the designer or company:
- Will I receive a dimensioned RCP and a separate electrical point schedule before the ceiling work begins?
- Who confirms fan, AC, curtain, wardrobe and kitchen conflicts on site?
- Are light fixtures, drivers, dimmers, regulators, sockets, plates, conduits and installation included or provisional?
- What happens if the bed, dining table or kitchen layout changes after the electrical drawing is approved?
- Which drawings and samples will be approved before procurement, and who bears the cost of an incorrect fitting?
- How will concealed drivers, junction boxes and ceiling access panels remain serviceable?
- Will the final installation be tested circuit by circuit, including polarity, earthing and switch-label clarity by the responsible electrical professional?
Warning signs during comparison
- The proposal uses phrases such as “electrical as required” without a room-wise point count.
- A render is presented as the only lighting drawing.
- The designer cannot show where drivers, junctions or access panels will be maintained.
- Switch locations are postponed until carpentry is installed.
- A large number of decorative fittings is recommended without discussing tasks, glare, heat or cleaning access.
The approval moment: one last coordinated review
Before paying an advance for execution or allowing the false-ceiling frame to start, compare the latest furniture plan, RCP, electrical schedule, wall elevations and quotation together. Mark every switchboard, socket, fan, AC point, light, driver and service opening. A redline review at this stage is more valuable than another mood-board revision.
Use this compact review list:
- Every room has an identified ambient, task and—where needed—accent layer.
- Bedside, kitchen, wardrobe, study and media-unit controls remain reachable after furniture installation.
- Fan blades, pendants, AC units, curtain tracks and storage do not compete for the same zone.
- Fixture quantities, specifications, cut-outs, drivers, wiring and installation responsibilities appear in writing.
- The quotation states exclusions, revision rules, payment stages and who coordinates site changes.
- The final drawing set has revision dates and is approved by the relevant responsible professionals.
Make the review easier to manage
WallsToWonder brings together design ideas, project and expert stories, practical posts and designers and companies serving the area through the Ambegaon Budruk directory. You can also use Design my room, Find my style and the AI interior assistant to organise ideas before discussing a coordinated lighting brief.
For comparisons with nearby service areas such as Narhe, Katraj, Dhayari and Bibwewadi, keep the same discipline: compare drawings, scope, materials and responsibilities rather than locality labels alone. Return to the Ambegaon Budruk listing when you are ready to review available options.
Frequently asked questions
When should lighting be finalised?
Final positions should be coordinated before false-ceiling framing, while furniture dimensions should be sufficiently settled to check switches, glare and access.
Is a central ceiling light enough for a bedroom?
It may provide general light, but bedside reading, wardrobe visibility and night-time control usually need separate task or local lighting.
How do I compare two electrical quotations?
Normalise the point counts and check whether wiring, switchgear, fixtures, drivers, ceiling work, installation, testing and revisions are included.
Should kitchen under-cabinet lighting be planned separately?
Yes. A separate circuit or switch allows task lighting to work without turning on all kitchen or ceiling lights.
Can lighting be changed after the false ceiling is complete?
Some fittings can be changed, but relocating wiring, cut-outs, drivers or concealed strips may require patching and repainting. Coordinated drawings reduce that risk.
Turn this idea into a plan for your home
Visualise your space, understand the likely budget, or find a professional who can bring the idea to life.